
In this article we will talk about receive connectors, creating SMTP Relay, moving connector from server to server, testing and troubleshooting all you need.
The following are the topics we will be discussing.
- What is receive connector how it works
- Choosing type
- Exporting and importing connector between servers
- Adding permission
- Authentication
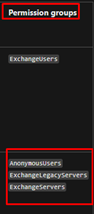
- Permission groups
- Permission granted
- And sending to external domains
- Log files
- How to test
What is receive connectors
Exchange servers use Receive connectors to control inbound SMTP connections from:
Messaging servers that are external to the Exchange organization.
Services in the transport pipeline on the local Exchange server or on remote Exchange servers.
Email clients that need to use authenticated SMTP to send messages.
A Receive connector listens for inbound connections that match the configuration settings of the connector.
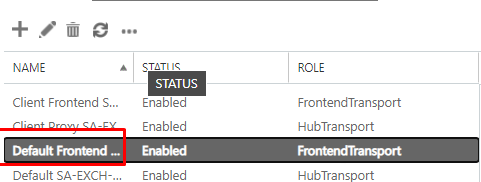
The following connector is the Default. We can use it but it is not recommended to do so
The default frondend (server name)
Note: You can assign TLS to the connector we may talk about it in another Blog
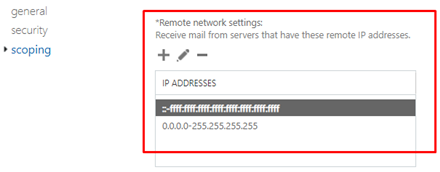
In the following as you can see this connector is responsible for receiving emails from outside on port 25 with any ranges of IP (specific IPs will be used later in creating relay).
This is entry point for exchange it means all exchange servers are communicating with this connector to start the process So, it means we can use this for relay but for security reasons we will not use it. Will talk about it later
The following table is every thing related to each connector
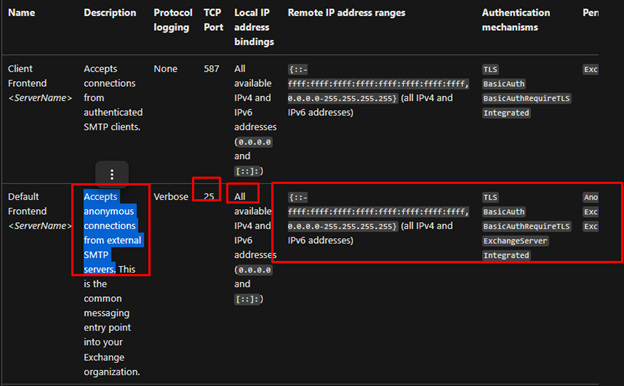
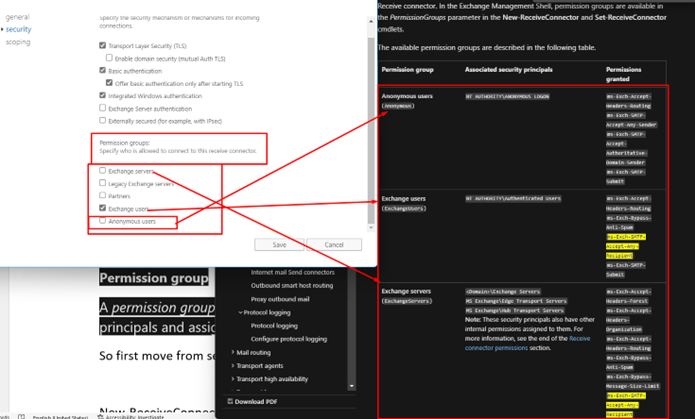
So first it uses port 25 for inbound, accepts anonymous connections from external SMTP, IP ranges to accept from any IPV4 any IPV6, authentication must have the following
Accept only when the following are met, and the following grouping of permissions are met
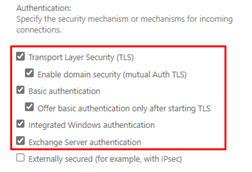
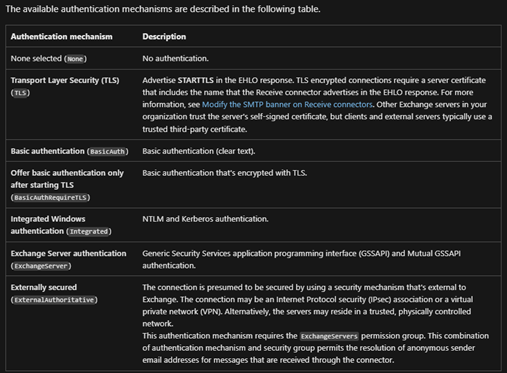
For more details about authentication mechanism
Receive connectors | Microsoft Docs
So as you can see it accepts from any mail server. We need to send using devices or apps so it is not a mail server
So We cannot use this as our SMTP relay for the following reasons.
Cause we need to send from unauthenticated account which means doesn’t have real mailbox.
Also, we want to limit from where the mail shall be sent, from which device, so we will narrow the remote IP settings in the scope
And the last thing we want to remove the authentication methods cause devices won’t have TLS and also they aren’t exchange servers
How it works
So now the question shall be
Which connector will be used if I create another connector?
Which one shall receive the message from devices like printer?
If I have a wide connector which is default and scope any IP and another one which is relay and scope is only specific IPS
The answer is:
Connectors use the most specific ranges which means if IPs is added to the new connector EX: 192.168.1.7
And the device is using this IP then this connector will be used for this device.
Now let’s start creating connector and the first thing is choosing type
Choosing type
To make it so simple type are combination of options
who from where can do what
Usage type = permission groups + authentication methods
permission groups = security principle/permission granted
The usage type specifies who is authorized to use the connector, the permissions they get, and the authentication methods that are supported.

Can be modified

Permission group
A permission group is a predefined set of permissions that’s granted to well-known security principals and assigned to a Receive connector.
So first create the connector from the ECP or if you want to move from server to server
New-ReceiveConnector -Name “SMTP relay” -Server “EX02-2019” -Usage Custom -TransportRole FrontEndTransport -PermissionGroups AnonymousUsers -Bindings 0.0.0.0:25 -RemoteIPRanges (Get-ReceiveConnector “EX01-2019\SMTP relay”).RemoteIPRanges
To allow smtp to send outside
Get-ReceiveConnector ” SMTP relay ” | Add-ADPermission -User “NT AUTHORITY\ANONYMOUS LOGON” -ExtendedRights “Ms-Exch-SMTP-Accept-Any-Recipient”
Create a dedicated Receive connector for anonymous relay

Test the Relay
Test the Relay
Install the telnet
First install telnet then open CMD the following Case Sensitive
pkgmgr /iu:”TelnetClient”
telnet
set localecho
set logfile <filename>
OPEN smtp.domain.com 25
EHLO Domain.com
MAIL FROM:user@domain.com
RCPT TO:<username@domaincom>
DATA
Subject: Test from anything
This is a test message
Type a period ( . ), and then press Enter
Log files
Protocol logging | Microsoft Docs
- Send connectors: %ExchangeInstallPath%TransportRoles\Logs\FrontEnd\ProtocolLog\SmtpSend
For more about online SMTP Relay
For Exchange online Relay
Featured Location


The Bolder Sky Lodge,
Lysefjord
Lysefjord or Lysefjordenis a fjord located in the Ryfylke area in Rogaland county in southwestern Norway. The 42-kilometer-long fjord lies in the municipalities of Strand and Sandnes, about 25 kilometers east of the city of Stavanger.
The name means light fjord and is said to be derived from the lightly coloured granite rocks along its sides.

[…] What is receive connector how it works Choosing type Exporting and importing connector between servers Adding permission Authentication Permission groups Permission granted And sending to external domains Log files How to test What is receive connectors Exchange servers use Receive connectors to control inbound SMTP connections from: Messaging servers that are external to the Exchange… — Read on profadmins.com/2022/09/06/exchange-on-prem-smtp-relay-all-you-want-to-know/ […]
LikeLike